- File size:
- 2 MB
- Date added:
- Nov 22, 2023 | Last update check: 1 minute ago
- Licence:
- Subscription-based
- Runs on:
- Revit 2020 / 2021 / 2022 / 2023 / 2024
GeminiBIM Tools for Revit is a set of three different tools that helps you to work with worksets, view filters, and view templates. These tools, called Workset Prompt, Template Transfer, and Add Filter+, cover the different tasks and are used independently. Workset Prompt is only applicable in a workshared Revit project. The other two tools, Template Transfer and Add Filter+, are related to VG (Visibility/Graphics).
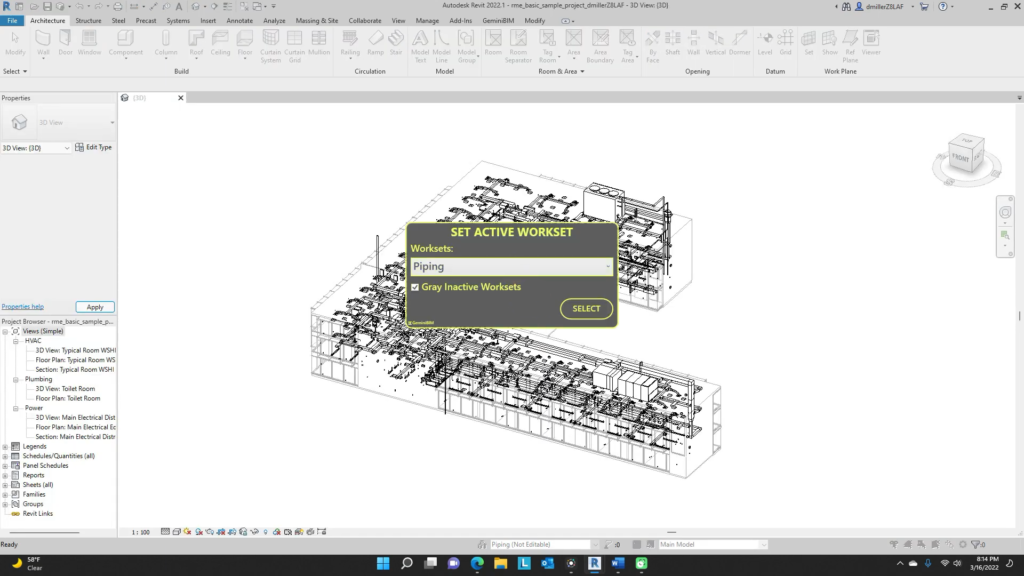
Workset Prompt. The first tool, the “Workset Prompt”, will prompt the users to select an active workset when opening a workshared model. It is a very common case that elements are not placed in a proper workset because users forgot to set workset. It can be tiring for a BIM manager to regularly control and correct these elements. This simple tool will remind users to select appropriate workset at the beginning of Revit session.
Template Transfer. Template Transfer helps you to manage view templates in a single Revit project. You just have to adjust one of the view templates and propagate the changes to the other view templates. With this tool you can ensure that the specified settings are consistent across multiple view templates.
- Transfer Project Standards. BIM managers can use this tool together with Revit’s built-in tool “Transfer Project Standards”. Template Transfer can be used to adjust view templates in a single project while Transfer Project Standards can be used to share view templates between multiple models. Unlike Transfer Project Standards, with Template Transfer you are not restricted with the transferring of visibility settings for Revit links.
Add Filter+. Add Filter+ helps you to manage view filters in a single Revit project. With this tool you can bulk add or modify filters applied to view templates. You can manually add and configure filters and assign them to multiple view templates or automate the process by copying view filters from an existing view template and assigning them to other templates.
Typical workflow:
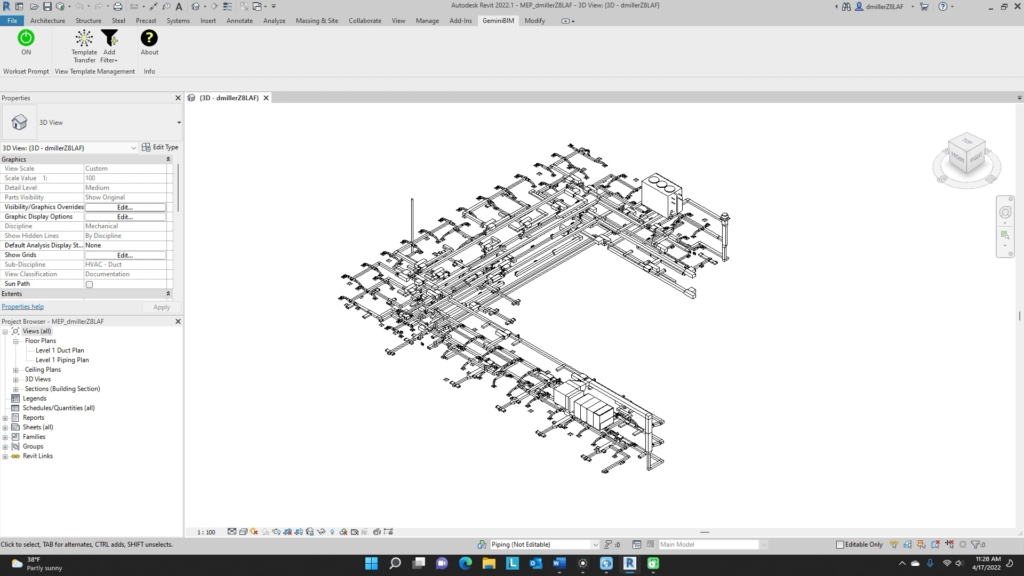
- Download and install. After you installed the plugin, open Revit and navigate to the new GeminiBIM tab in the ribbon. You will find three buttons: “Workset Prompt”, and “Template Transfer” and “Add Filter+” grouped as “View Template Management”.
- Workset Prompt.
- Activate the tool. This function is disabled by default which is indicated by the red OFF icon. Just click the icon to activate it which is indicated by the green ON icon.
- Select a workset. After you activated the icon, close and re-open the Revit to see it in action. You are prompted with a dialog box to select a workset. By default the last selected workset is active. Optionally you can check the “Gray Inactive Workset” option.
- Deactivate the tool. If you want to deactivate the add-in navigate back to the GeminiBIM tab and click the green ON button.
- Template Transfer.
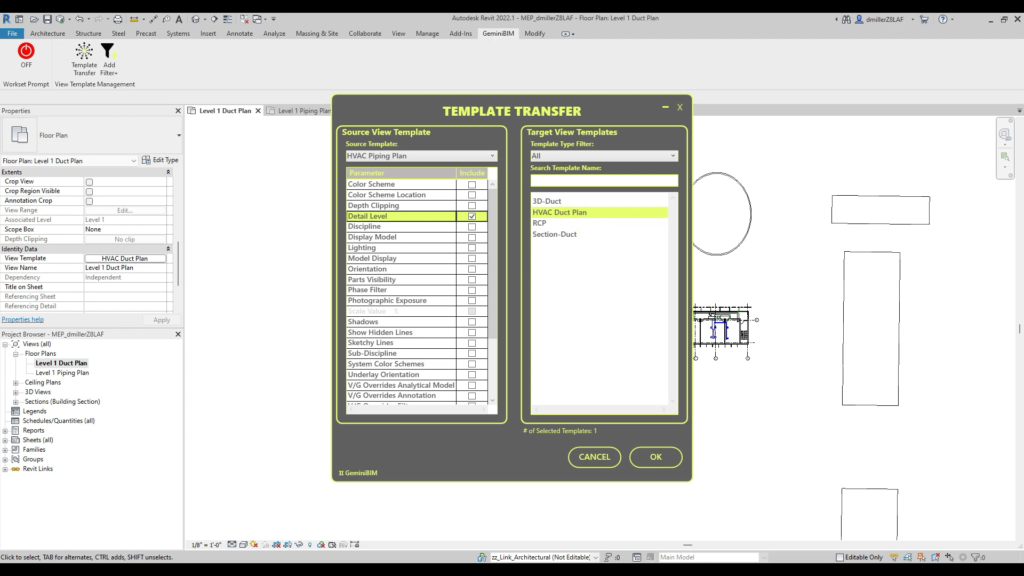
- Open the dialog box. Click “Template Transfer” button to open Template Transfer dialog box. You will see two columns.
- Set source view template. In the left column select the source template to transfer from. Select the parameters and settings you want to copy.
- Set target view template(s). In the right column select the target view template(s) you want to modify. You can filter the target view list by using the template type and template name filters.
- Apply changes. Click OK to modify the chosen view template. It is modified with the same settings as the source template you choose. You will see a message that informs you how many view templates were successfully modified.
- Add Filter+.
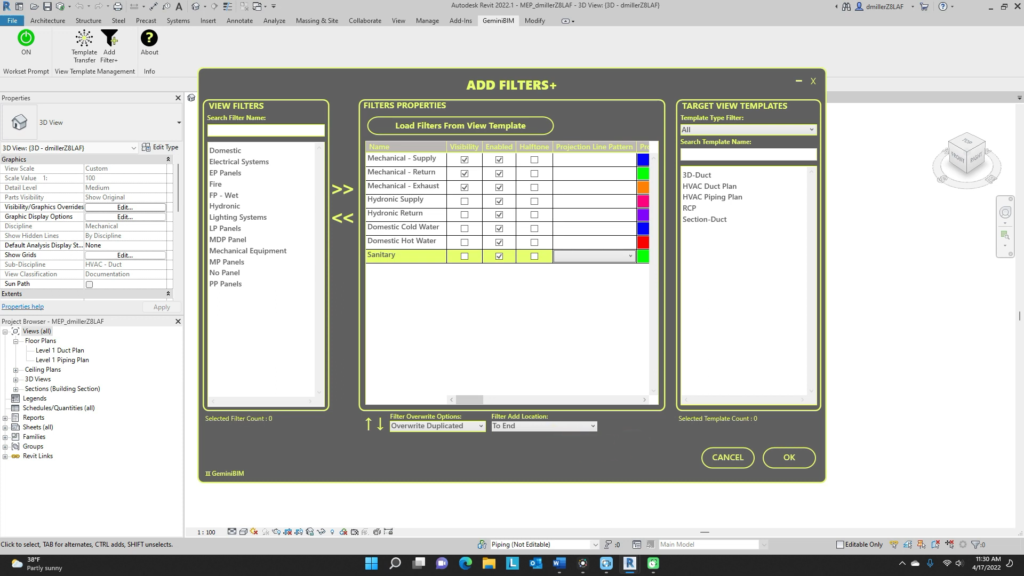
- Open the dialog box. Select Add Filter+ button from the ribbon. You will see the Add Filter+ dialog box.
- Add filters to modify. There are two methods to add desired filters to the Filters Properties area:
- Add filters from the View Filters list. You can use search box to search for a filter name. Use arrows to move filters between View Filters and Filters Properties areas.
- Load filters from an existing view template. Click “Load Filters From View Template” button, choose a view template from the drop-down menu, and click OK. Filters will be added with the visibility and graphical settings of the selected view template.
- Modify filters. Modify the filter visibility and graphical properties using the available checkboxes, drop-down boxes and color selection boxes. Solid grey boxes indicate parameters that cannot be modified. Use arrow button below Filter Properties area to move the filters up and down the list.
- Set filter overwrite. Use “Filter Overwrite Options” drop-down menu to select how filters from Filters Properties list will be assigned to the target view templates. You can overwrite all filters, which means all existing filters from the target view templates will be modified or deleted; you can overwrite only duplicated filters; or you can choose to not overwrite filters, which means only new filters will be added to the target view templates. Also you need to specify the filter add location (not available for Overwrite All option). It can be “To End” or “To Top” of the existing filter list of the target view templates.
- Select the target view templates. You don’t select targeted filters but the target view template(s) to add or modify its filters. You can use search box and filter by template type to narrow the available list.
- Apply changes. Select OK to modify the target view template(s). You will see a message that informs you how many view templates are successfully modified.
What’s new in version 1.1:
- Support for Revit 2024.
- “Add Filters+” supports Selection Filters.
Gallery

GeminiBIM Tools ribbon tab in Revit. ©GeminiBIM

Workset Prompt dialog box. ©GeminiBIM

Template Transfer dialog box. ©GeminiBIM

Add Filter+ dialog box. ©GeminiBIM