- File size:
- 2.2 MB
- Date added:
- Feb 05, 2022 | Last update check: 1 minute ago
- Licence:
- Trial
- Runs on:
- Revit 2018 / 2019 / 2020 / 2021 / 2022
Auto Join Geometry for Revit is an add-in that allows you to join/unjoin elements automatically. It is a stable application that improves modeling and team productivity. This plugin provides two commands: “JoinCategory” and “JoinElementSet”. You can choose if you want to join/unjoin elements between categories or between element groups. The easiest way to select element sets is to use 3D view and schedule.
Typical workflow:
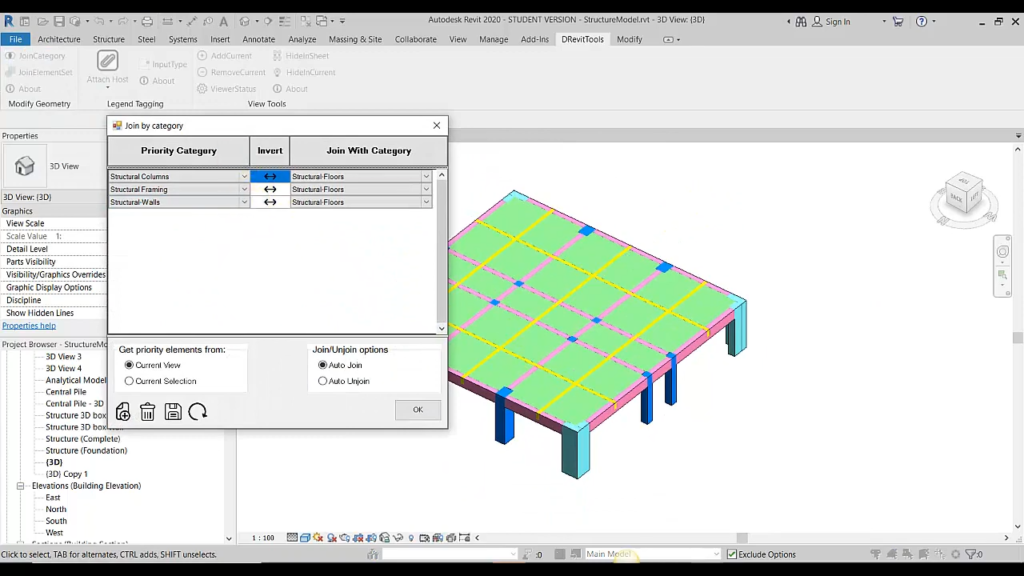
Join/Unjoin elements between categories
- Select button “JoinCategory” to trigger the application.
- Add/delete rules by right-click and select add/delete rule.
- At tab “Get priority elements from”:
- Select “Current View” if you want to apply join/unjoin geometry for current view.
- Select “Current Selection” if you want to apply join/unjoin geometry for current selection.
- At tab “Join/Unjoin options”:
- Select “Auto Join” if you want to join geometry.
- Select “Auto Unjoin” if you want to unjoin geometry.
- Click “OK”.
- If you want to save/reload setting rules click button save/reload setting rules.
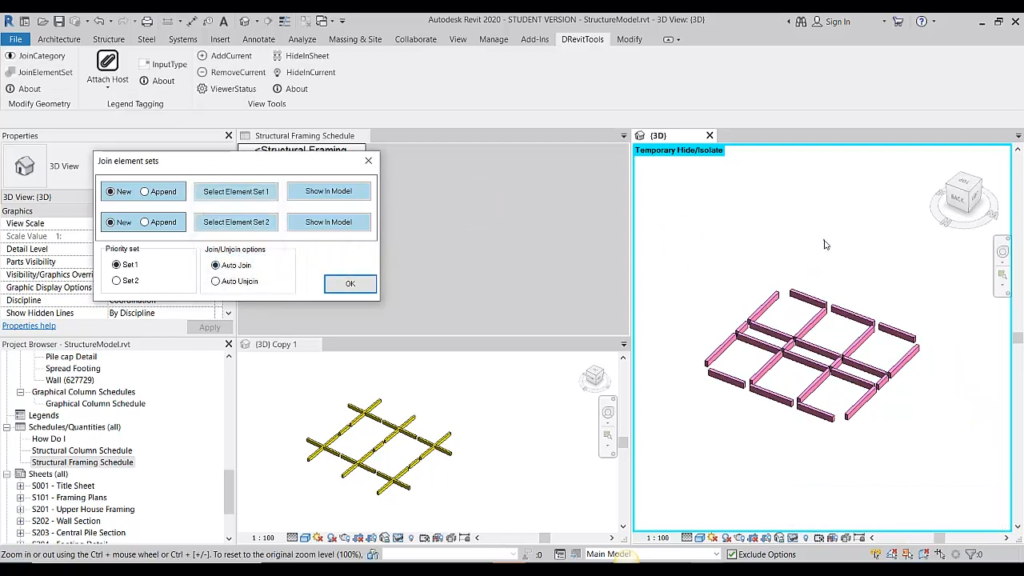
Join/Unjoin elements between element groups
- Select button “JoinElementSet” to trigger the application.
- Select element set 1:
- You have options to select new elements or append into existed set by selecting radio “New” or “Append”.
- Click button “Select Element Set 1”.
- Go to Revit view then select elements, after that click “Finish”.
- Select element set 2:
- You have options to select new elements or append into existed set by selecting radio “New” or “Append”.
- Click button “Select Element Set 2”.
- Go to Revit view then select elements, after that click “Finish”.
- At tab “Priority set”:
- Select “Set 1” if you want elements in set 2 to be cut by elements in set 1.
- Select “Set 2” if you want elements in set 1 to be cut by elements in set 2.
- At tab “Join/Unjoin options”:
- Select “Auto Join” if you want to join geometry.
- Select “Auto Unjoin” if you want to unjoin geometry.
- Click “OK”.
Auto Join Geometry for Revit V1.0.1 updates
- 1.0.1 Update | Support for Revit 2021.
What’s new in version 1.0.0:
This is initial release.
Similar software
- Auto Join for Revit – Helps you join/unjoin multiple elements simply and efficiently, according to the rules set by the user.
- TL SOLIDS Interaction Tool for Revit – Free add-in for solids interactions and operations (join-unjoin, switch join order, cut-remove cut) in Autodesk Revit.
- Holixa Tools for Revit – Holixa Tools for Revit (formerly CADstudio Revit Tools) is an useful add-on set of various tools that will increase your everyday productivity in Autodesk Revit.
- Kobi Toolkit for Revit – Set of easy-to-use tools that extend the Revit’s capabilities in key areas and make work easier and more efficient.
About D’Bim Tools
D’Bim Tools is creating Autodesk add-ins which help you done more with less time and energy. Delivers as efficient, simplest as possible applications to handle tedious tasks and complex operations.
Gallery

Join/unjoin elements between categories or between element groups. ©David Võ

Join/unjoin elements between element groups. ©David Võ